采用这个接口层写程序,基本上可以说不用再去管所用的是什么操作系统。相同的代码可以轻而易举的移植到不同的实时系统中。不敢说完全没有改动,但绝对是最少的。其简洁的书写手法,也会给我的应用层带来视觉上的体验感,使用可以尽可能去关注应用。
下面先用uCOS-II系统接口为例进行简单概述:

这里是主要的配置区,你所用到哪些功能用0或1来选择和取消。由于有些和系统中宏配置有相同意思的宏配置,所以我这里直接用了系统配置中的宏。
这是所用不同系统时的主要不同处。其他地方就很少会改动了。
下面来举例来说明如何简单的使用这个接口。
首先进入main函数,官方样例代码:
1 if (osKernelInitialize () != osOK) { // check osStatus for other possible valid values
2
3 // exit with an error message
4
5 }
6
7 if (!osKernelRunning ()) { // is the kernel running ?
8
9 if (osKernelStart () != osOK) { // start the kernel
10
11 // kernel could not be started
12
13 }
14
15 }
进入首个函数中我们就需要建立任务
代码事例:
图上是RTX的接口代码所以,所用的栈地址,和栈大小有点不一样,uCOSII的是如下定义:
1 static uint32_t taskLedStk[TASK_LED_STK_SIZE] = {0};
2
3 osThreadDef(TaskLed, TASK_LED_PRIO, taskLedStk, TASK_LED_STK_SIZE);
下面介绍信号量样例代码:
1 osSemaphoreDef(LED_CTRL);           //定义信号量
2 osSemaphoreId osSem = NULL;         //信号量句柄
3 osSem = osSemaphoreCreate(osSemaphore(LED_CTRL), 0);        //建立一个信号量 初值为0
4 osSemaphoreRelease(osSem);      //释放一个信号量
定时回调函数事例代码:
1 #include "cmsis_os.h"2 void Timer1_Callback (void const *arg); // prototypes for timer callback function 3 void Timer2_Callback (void const *arg); 4 osTimerDef (Timer1, Timer1_Callback); // define timers 5 osTimerDef (Timer2, Timer2_Callback); 6 uint32_t exec1; // argument for the timer call back function 7 uint32_t exec2; // argument for the timer call back function
8 void TimerCreate_example (void) { 9 osTimerId id1; // timer id 10 osTimerId id2; // timer id 11 // Create one-shoot timer 12 exec1 = 1; 13 id1 = osTimerCreate (osTimer(Timer1), osTimerOnce, &exec1); 14 if (id1 != NULL) { 15 // One-shoot timer created 16 } 17 // Create periodic timer 18 exec2 = 2; 19 id2 = osTimerCreate (osTimer(Timer2), osTimerPeriodic, &exec2); 20 if (id2 != NULL) { 21 // Periodic timer created 22 } 23 : 24 }
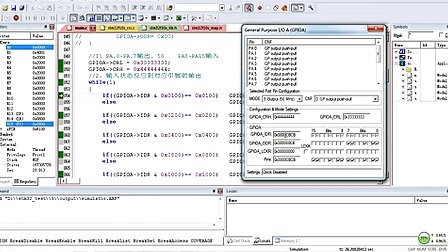
好了, 这些只大概的进行说明。如果想知道更多的内容,你可以考虑安装keil5.0。如下图可以看到所有接口讲解和使用方法。